Import from Blender
- Home
- Getting Started
- Import FBX/DAE
- Import from Blender
This page describes the method of exporting 3d models from Blender to Cascadeur.
Note
The algorithm presented here only uses Blender’s built-in functionality. If you rely on third-party extensions, your methods of export may be different.
Export Formats and Settings
For import, you can use either FBX or Collada files.
It is recommended to use FBX format, as it is better supported by Cascadeur and less likely to cause problems during import. However, in rare cases these problems do occur, using Collada might help solving them.
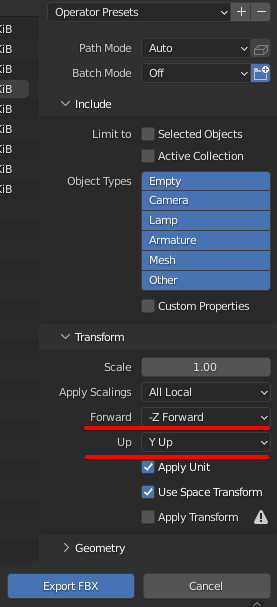
For FBX export, use the default settings with minor alterations:

1. Forward should be set to -Z Forward.
2. Up should be set to Y Up.
This is required because Blender and Cascadeur have slightly different coordinate systems: in Blender, the Z axis is the one facing up, while in Cascadeur, it is Y.
With these settings, your character should work in Cascadeur without issues.
Importing Sample Scenes
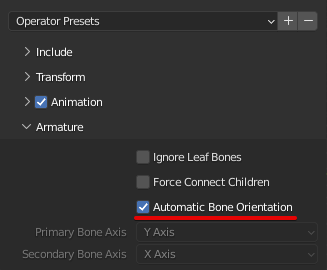
If you are importing animation made with sample scenes included in Cascadeur, you'll also need to enable the Automatic Bone Orientation parameter:

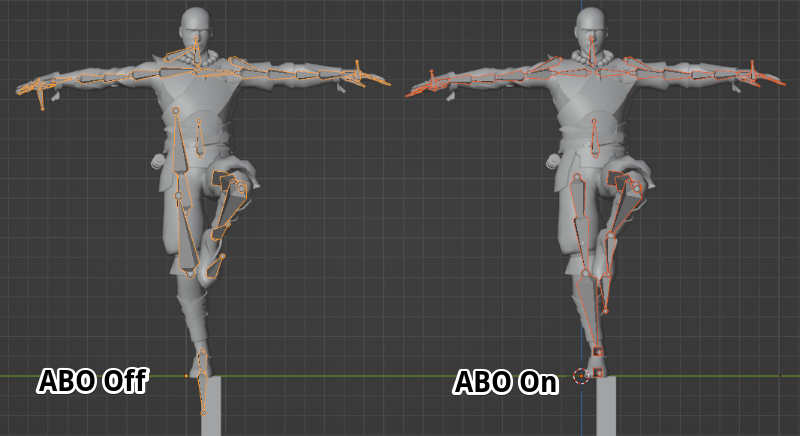
Without it, the joints in the character's skeleton won't be properly aligned:

The same animation with Automatic Bone Orientation disabled (left) and enabled (right).
Importing animation with default settings causes issues. Enabling Automatic Bone Orientation fixes these issues.
This issue is native to Blender. It only applies to sample scenes, custom characters should work without issues.
Exceptions
Sometimes you might encounter models that work fine when exported to Cascadeur, but display issues when brought back to Blender.
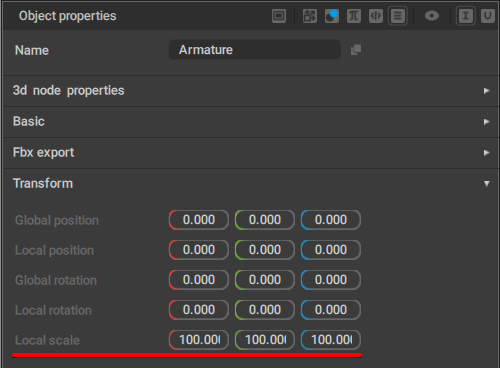
This is caused by the incorrect scale of the top object in the joint hierarchy, which in turn happens because of the way Blender handles FBX export, namely object scaling:

If the top object in the Joint hierarchy has its Local scale parameters set to 100 (instead of 1.0),
exporting this character back to Blender will lead to the issue shown above.
This issue too is native to Blender and arises due to the way it handles FBX file format.
What to do about it should depend on your goals:
-If you only need animation (to render it, for example), the issues with the joints can be ignored.
-If you need your character to have a properly functioning skeleton, the best option is to use alternative importing methods such as third-party add-ons.
You can also try the following experimental method of exporting your character from Blender with the correct scale:
Note
Before attempting this method, we recommend exporting the “original” model, without any modifications that come next. Later, the “original” pose’s joint translations can be copied to the “corrected” model.
1. Select your character’s Armature object in the Viewport or the Outliner window (in the top right corner).
2. Bring up the Sidebar (press N key) and switch to the Item tab.
3. (Optional) If the Armature has any of its Location and Rotation values set to non-zero, select them and set them to zero. If the Armature itself has a Scale value that’s not 1.1.1, press Ctrl+A and click “Scale”.
4. Go into Pose mode (Ctrl+Tab or change the mode in the top left corner)
5. In the Outliner window, find and select your character’s root bone (the child of the Armature object).
6. (Optional) If the Timeline contains keyframes, select and delete them with the Delete key.
7. In the Item tab, find the Scale input fields and set them all to 100. If the Armature has multiple root bones, select and scale them up too.
Note
If your rig has IK/FK controls for arms and legs, set all of them to FK before you attempt to scale the root bone(s).
8. Switch back to the Object mode (Ctrl+Tab)
9. Select the character mesh. If your character has a lot of meshes, you can use the “Select -> Select All by Type -> Mesh” command in the top left corner of the Viewport.
10. Press Alt+P and select “Clear and Keep Transformation” in the appeared menu
11. Select the character mesh in the Viewport or the Outliner window. In the Modifiers tab (wrench icon to the left of the Properties window in the bottom right corner), click on the Armature modifier, and with the cursor standing on top of it, press Ctrl+A to apply the modifier. Repeat this step for each other mesh belonging to your character
12. Select the Armature and go to the Pose mode again (Ctrl+Tab).
13. Select the root bone. Select “Pose -> Apply -> Apply Pose as Rest Pose”. That should reset the scale of the selected root bone from 100 back to 1. If your character has multiple root bones, repeat this step for each one too.
14. Switch back to the Object mode (Ctrl+Tab).
15. Select the character mesh, then select the Armature with the held-down Shift key. Press Ctrl+P and select “Armature Deform” in the appeared menu. Repeat this step for all other character meshes belonging to your character. Alternatively, you can first select all character meshes with the held-down Shift key and then select the Armature last
16. In the Scene tab (“cone with a bubble” icon to the left of the Properties window in the bottom right corner), select the Units tab and change the Units Scale value to 0.01.
17. Export your corrected character model (File -> Export -> FBX) with the following changes to the standard export settings:
- In Object Types, select Armature and Mesh
- In the Transform tab, set Forward to “-Z Forward” and Up to “Y Up”
- In the Armature tab, turn off the “Add Leaf Bones” setting
- Turn off the “Bake animation” setting
If the pose of the “corrected” model has been twisted after export and you have previously exported the “original” model, you can go through the following steps:
1. Import the “corrected” model into the scene. Create a second new scene, then import the “original” model into it.
2. In the Outliner window, right-click on the Armature and click the “Select branch” - this will select the Armature and all of its child objects.
3. Copy (Ctrl+C) the transforms of the selected objects in Global mode (G/L button in the top left corner).
4. Switch to the scene with the “corrected” model and repeat the step 2.
5. Paste (Ctrl+V) the transforms to the selected objects in Global mode.
When you import the “corrected” model back to Blender, its Armature’s scale will be set to 0.01.
To set the Armature’s scale to 1:
1. Select the Armature
2. Press Ctrl+A and select “Scale”